Table of Contents
ToggleDeck railings serve two critical functions: they keep people safe and they define the look of your outdoor space. Factory-standard railings do the job, but they rarely inspire. Whether you’re replacing worn-out balusters or building a new deck from scratch, custom railings offer an opportunity to add personality without blowing your budget. This guide covers practical, code-compliant DIY railing options, from classic wood designs to modern cable systems, along with the tools, materials, and techniques needed to pull them off. Most projects require intermediate carpentry skills, basic metalworking knowledge, and careful attention to local building codes.
Key Takeaways
- DIY deck railings cut professional installation costs by 40-60%, reducing expenses from $50-$120 per linear foot to materials only while giving you complete design control.
- Wood and composite railing projects offer budget-friendly options starting at $8-15 per linear foot for pressure-treated lumber or $3-6 per composite baluster with a hybrid framing approach.
- Cable railing systems provide a modern aesthetic with nearly invisible profiles, though installation requires precise drilling, proper tensioning (250-350 pounds of force), and careful attention to the 4-inch spacing code requirement.
- All railings must meet International Residential Code (IRC) standards: minimum 36-inch height, balusters spaced so a 4-inch sphere cannot pass through, and ability to withstand 200-pound concentrated loads.
- Creative alternatives like branch and twig railings, corrugated metal panels, and rope railings let you customize DIY deck railings for rustic, industrial, or nautical themes at minimal cost.
- Proper installation requires secure post anchoring with bolts, cutting end-sealing on lumber, correct tools (miter saw, speed square, cable cutter), and finish maintenance every 2-4 years for long-term durability.
Why Choose DIY Deck Railings Over Professional Installation
Labor costs for professional railing installation typically run $50 to $120 per linear foot, depending on material and design complexity. DIY installation cuts that expense to materials only, which can represent savings of 40-60% on most projects.
Beyond cost, building your own railings gives you complete control over design, material selection, and finish quality. You can match existing trim details, incorporate salvaged materials, or modify dimensions to fit awkward transitions that prefab systems can’t handle. Homeowners who’ve tackled basic carpentry projects, installing trim, building simple furniture, or framing a shed, have the foundational skills needed for most railing builds.
That said, not every railing project suits DIY. Multi-story decks, complex curved sections, or installations requiring welding and metal fabrication may justify hiring pros. Always check local building codes before starting. The International Residential Code (IRC) requires guardrails on decks more than 30 inches above grade, with a minimum height of 36 inches (42 inches in some jurisdictions). Balusters must be spaced so a 4-inch sphere cannot pass through. Permits are often required for structural railing work.
Budget-Friendly DIY Deck Railing Ideas
Cost-conscious builds don’t have to look cheap. Simple materials used thoughtfully often outperform expensive prefab kits in both appearance and durability.
Wood and Composite Railing Projects
Pressure-treated pine remains the most economical railing material, running $8–$15 per linear foot for dimensional lumber. For a clean look, rip 2×2 actual balusters from standard 2x4s (actual dimensions 1.5″ x 3.5″) using a table saw. Space them evenly at 3.5 to 4 inches on center to meet code, and secure them to top and bottom rails with exterior-grade screws or a finish nailer and 2-inch galvanized nails.
Staining or painting pressure-treated lumber requires patience. Let the wood dry for 4–6 weeks before applying finish, or use a moisture meter to confirm wood moisture content is below 15%. Skip this step and you’ll see peeling within a year.
Composite balusters offer a low-maintenance upgrade without the full cost of composite systems. Many DIYers frame railings with pressure-treated posts and rails, then fill with composite balusters. This hybrid approach saves 30–40% versus all-composite kits while eliminating the need to stain balusters every few years. Expect to pay $3–$6 per composite baluster.
For a farmhouse or cottage aesthetic, consider horizontal board railings. Use 1×4 or 1×6 boards spaced 3–4 inches apart, mounted horizontally between posts. This design uses less material than vertical balusters and creates clean sight lines. Just ensure spacing meets the 4-inch sphere rule. Many builders following free furniture plans adapt similar techniques for outdoor railing projects.
Reclaimed wood adds character at minimal cost if you have access to salvaged materials. Old fence pickets, barn siding, or pallet wood can be milled and refinished for unique balusters. Inspect reclaimed lumber carefully for rot, insect damage, and structural integrity before use. Even weathered wood needs proper sealing for exterior exposure.
Modern and Industrial DIY Railing Designs
Contemporary deck designs favor clean lines, minimal visual obstruction, and durable materials that age gracefully.
Cable and Metal Pipe Railings
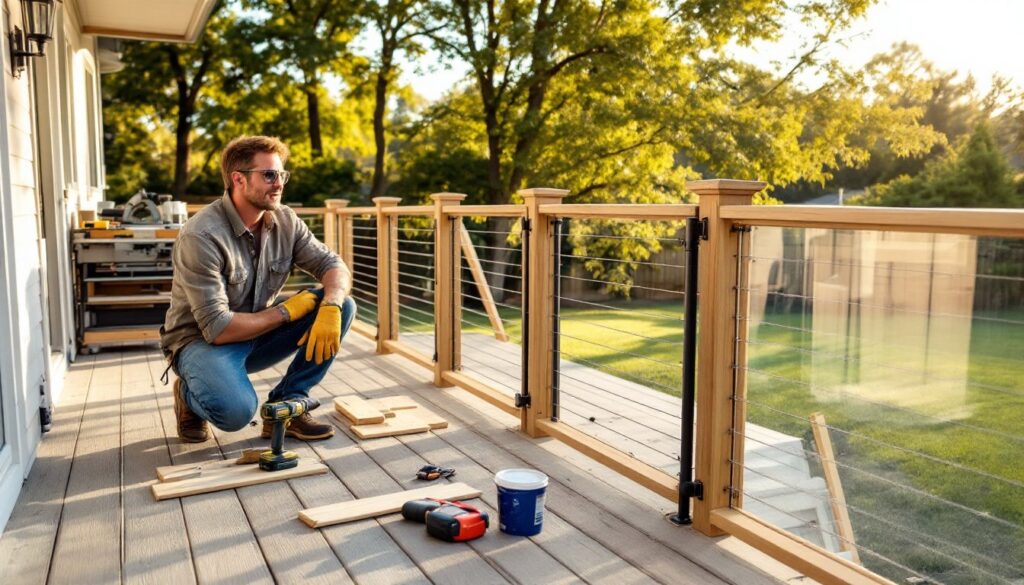
Cable railing systems have surged in popularity for their nearly invisible profile and modern aesthetic. DIY kits include stainless steel cable (typically 1/8-inch or 3/16-inch diameter), tensioning hardware, and mounting posts. Expect to spend $40–$80 per linear foot for quality components.
Installation requires drilling precise holes through posts for cable runs, usually spaced 3 to 3.5 inches apart vertically. Use a drill press or sturdy handheld drill with a 5/16-inch bit for 1/8-inch cable. Cables must be tensioned to 250–350 pounds of force using turnbuckles or proprietary tensioners, slack cables fail code and sag over time. This isn’t a project to rush. Measure twice, drill once, and budget extra time for tensioning adjustments.
Wood or metal posts work equally well. 4×4 posts provide enough material thickness for through-drilling without splitting. If using metal posts, choose schedule 40 steel pipe or square tubing with wall thickness of at least 1/8 inch.
Black iron pipe railings deliver industrial style at modest cost. Build the frame from 1-inch to 1.5-inch black iron pipe using standard plumbing fittings: elbows, tees, and floor flanges. Assemble sections dry-fit first, then disassemble and apply pipe thread sealant or Teflon tape before final assembly. Secure posts to the deck with heavy-duty lag bolts (minimum 3/8-inch diameter, 4 inches long) into solid blocking or rim joists.
Pipe railing can be left raw for a rusted patina, sealed with clear coat, or painted with rust-inhibiting metal primer and exterior enamel. For vertical infill, weld or bolt 1/2-inch rebar or thin-wall conduit between horizontal rails. Welding adds complexity but creates seamless joints. If you’re not confident with a MIG welder, threaded fittings and set screws work fine for non-load-bearing infill.
Another modern option: tempered glass panels. These provide unobstructed views and a high-end look, though material costs run higher, $100–$200 per panel depending on size. Installation involves mounting panels in aluminum U-channel or drilling and securing with standoff hardware. Handling large glass panels requires two people and extreme care. Tempered glass won’t shatter into sharp shards, but it’s still heavy and unforgiving.
Creative and Unique Deck Railing Ideas
Custom railings make a statement when you’re willing to think beyond standard balusters.
Branch and twig railings suit rustic cabins and natural settings. Collect straight hardwood branches (avoid soft, rotting wood) in 1.5 to 3-inch diameters, strip the bark, and sand smooth. Secure them vertically or in decorative patterns using exterior screws countersunk and filled. Apply multiple coats of spar urethane to protect against moisture and UV damage. This design takes more time than straight-cut lumber but costs nearly nothing if you harvest your own materials.
Lattice panels offer a traditional look with good airflow and partial privacy. Standard 4×8-foot pressure-treated lattice sheets cost $25–$40 and can be cut to size. Frame each panel with 1×4 trim to hide cut edges and provide structural support. Lattice works best on covered or partially shaded decks, full sun exposure can warp cheaper vinyl options.
Decorative metal inserts add visual interest without custom fabrication. Salvaged wrought iron panels, laser-cut metal screens, or even repurposed iron gates can be incorporated into wood frames. Drill pilot holes and use stainless steel bolts with washers to attach metal to wood, this prevents rust stains. Metal panels can be powder-coated or painted to match your deck’s color scheme.
For coastal or nautical themes, rope railings create authentic maritime character. Use 1.5-inch or 2-inch manila or synthetic rope threaded through drilled posts. Rope must be kept taut and replaced every few years as it stretches and degrades. UV-resistant synthetic rope (polyester or nylon) lasts longer than natural fibers but lacks the organic texture. Secure rope ends with marine-grade eye bolts and turnbuckles for tensioning.
Corrugated metal panels bring farmhouse or industrial style at low cost. Standard 26-gauge galvanized panels run $15–$30 per 8-foot sheet. Cut panels to height with tin snips or a circular saw equipped with a metal-cutting blade (wear eye protection, metal shards fly). Frame panels with wood or metal and secure with self-tapping screws and rubber washers to prevent leaks.
Essential Tips for Building Your Own Deck Railing
Successful railing projects come down to preparation, precision, and knowing when to ask for help.
Start with accurate measurements. Measure each railing section individually, decks settle and shift, so don’t assume all sections are identical. Calculate baluster spacing by dividing the distance between posts (minus post widths) by the number of balusters, ensuring gaps stay under 4 inches.
Anchor posts securely. Railing posts carry lateral loads from leaning, bumping, and (if you have kids) climbing. Posts should be bolted through the deck rim joist or band board with 1/2-inch galvanized carriage bolts or lag bolts, minimum 6 inches long. Use two bolts per post, staggered vertically. For extra strength, install blocking between joists behind posts. Posts notched over the deck rim provide better load transfer than surface-mounted brackets, though they require more precise cutting.
Prep and prime all surfaces before assembly. Cut ends of pressure-treated lumber absorb moisture rapidly, leading to rot. Brush cut ends with copper naphthenate preservative or end-cut sealer. Prime all wood with exterior primer before final assembly to protect joints that will be inaccessible later.
Invest in the right tools. A miter saw makes quick, consistent angle cuts for posts and rails. A speed square ensures accurate baluster spacing and plumb installation. For cable railing, a cable cutter (not bolt cutters) produces clean cuts without fraying. If drilling metal, use cobalt or titanium drill bits and cutting oil to extend bit life.
Don’t skip safety gear. Wear safety glasses when cutting, drilling, or grinding. Use hearing protection with power saws and impact drivers. Work gloves protect hands from splinters and sharp metal edges, though remove them when operating power tools to prevent catch hazards. Projects involving workshop power tools demand the same attention to safety as any professional job site.
Understand load requirements. The IRC requires railings to withstand a 200-pound concentrated load or a 50-pound per linear foot distributed load applied horizontally at the top rail. Your railing must be strong enough to catch a falling person. If you’re unsure whether your design meets structural requirements, consult an engineer or building inspector before installation.
Factor in expansion and contraction. Wood moves with seasonal humidity changes. Leave 1/8-inch gaps between boards in horizontal railing designs to allow swelling. Metal railings expand with heat, use slotted mounting holes or expansion joints on runs longer than 12 feet.
Finish properly. Exterior stains and sealers need reapplication every 2–4 years depending on sun exposure and climate. Clear sealers offer minimal protection, use semi-transparent or solid stains with UV blockers for longer-lasting results. Metal railings benefit from annual inspection and touch-up with rust-inhibiting primer on any scratches or worn spots.
Many detailed project plans, similar to those found in comprehensive home repair guides, break down railing installations step-by-step with cut lists and hardware specs. Don’t hesitate to consult multiple resources before committing to materials.
If your deck is more than one story high, involves complex angles, or you’re simply not comfortable with the structural responsibility, hire a licensed contractor. Some things are worth the peace of mind.