Table of Contents
ToggleGarbage disposal installation isn’t rocket science, but it sits right at the intersection of plumbing and electrical work, two trades that can turn a weekend warrior into a very frustrated homeowner. While manufacturers market many models as “easy install,” the reality involves shutting off power, working under a cramped sink, dealing with drain lines that may not be up to code, and sometimes rewiring a switch. That’s why thousands of homeowners hire pros for this job every year. This guide breaks down what professional installation services actually entail, what they cost, when you genuinely need one, and how to pick a quality installer who won’t leave you with a leak or a tripped breaker.
Key Takeaways
- Garbage disposal installation services handle the complete removal of old units and installation of new ones, including plumbing reconnection, electrical wiring, and system testing, typically completed in 1–2 hours for straightforward swaps.
- DIY installation may save $150–$300 but risks costly repairs ($200–$400) if you lack experience with both plumbing and electrical work, making professional installation worthwhile for most homeowners.
- Hiring a licensed plumber is essential when dealing with old drain pipes, new electrical circuits, septic systems, or when manufacturers require professional installation to preserve warranty coverage.
- Professional garbage disposal installation costs range from $100–$250 for labor-only services to $250–$550 for full-service packages, with add-ons like new circuits ($150–$400) and drain modifications ($75–$200) significantly increasing total expenses.
- Choose licensed plumbers with verified credentials, brand familiarity, written estimates, and documented warranty terms; avoid providers who pressure same-day decisions, refuse to share license numbers, or quote far below market rates.
- Common installation issues like leaking flanges, disposal jams, and inadequate electrical circuits require professional diagnosis and repair, which experienced installers solve using proper tools, code knowledge, and replacement parts.
What Are Garbage Disposal Installation Services?
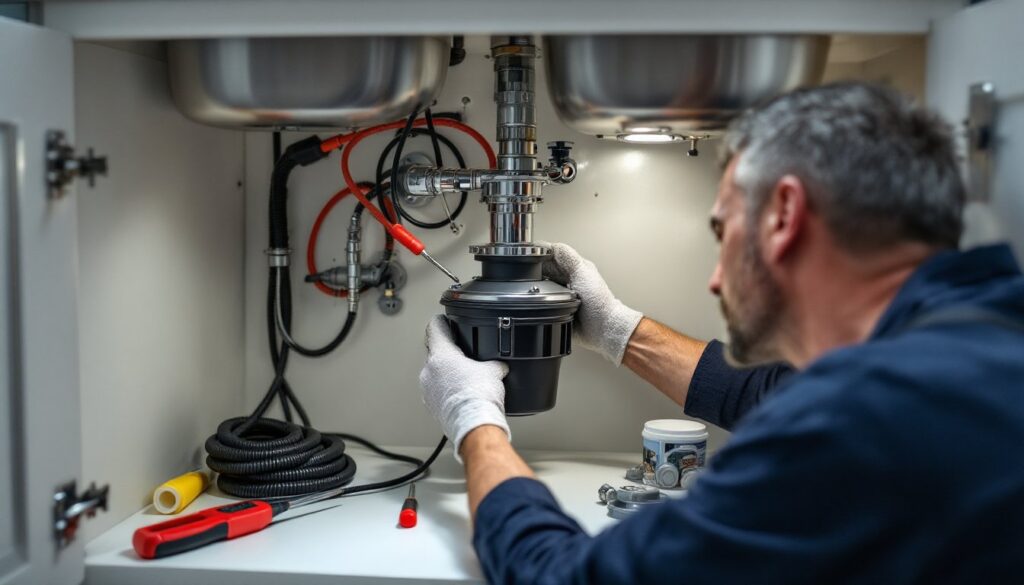
Professional garbage disposal installation services cover the complete process of removing an old unit (if present) and installing a new disposal under your kitchen sink. This includes disconnecting and reconnecting plumbing drain lines, wiring the unit to a dedicated electrical circuit, mounting the disposal to the sink flange, and testing the system for leaks and proper operation.
Most services include hauling away the old unit, ensuring local plumbing and electrical codes are met, and providing a warranty on labor, typically 30 to 90 days. The installer will verify you have a dedicated 15- or 20-amp circuit for the disposal (required by the National Electrical Code for most installations) and may upgrade wiring or add a switch if your setup lacks one.
Some providers offer disposal purchase bundled with installation, while others install customer-supplied units. Expect the visit to take 1 to 2 hours for a straightforward swap, longer if significant plumbing modifications or electrical work is needed.
When to Hire Professional Installation vs. DIY
DIY installation makes sense if you’re comfortable working with both plumbing and electrical systems, your sink already has a disposal flange in good condition, and there’s an existing switched outlet or hardwired connection under the sink. You’ll need a screwdriver, slip-joint pliers, wire strippers, and possibly a hammer for the mounting ring. If you’ve replaced a P-trap or wired a light fixture before, you’re probably fine.
Hire a pro if any of these apply:
- No existing electrical outlet or switch. Running a new circuit or installing a switch box requires working inside walls and meeting NEC requirements, this is permit territory in most jurisdictions.
- Cast iron or galvanized drain pipes. Older homes often have drain stacks that require adapter fittings or cutting. Amateurs frequently crack cast iron or strip threads on old galvanized pipes.
- Septic system concerns. Not all septic systems handle disposal waste well: a plumber can assess your tank size, leach field capacity, and recommend models with finer grind capabilities or advise against installation altogether.
- Double-bowl sinks without existing disposal. You’ll need to modify the drain configuration and possibly install a dishwasher tailpiece with an air gap, which gets fiddly fast.
- Warranty preservation. Some manufacturers void warranties if installation isn’t done by a licensed plumber, check your paperwork.
If you’re on the fence, recognize that the average DIY disposal install gone wrong costs $200 to $400 to fix, often wiping out any savings.
What to Expect During Professional Installation
A reputable installer will start by assessing your current setup before touching a wrench. They’ll check sink flange condition, measure drain pipe alignment, confirm electrical supply, and verify adequate space under the sink (disposals range from 12 to 18 inches in height: deep units won’t fit under shallow sinks).
The installation sequence typically follows this order:
- Shut off power at the breaker and verify it’s dead with a voltage tester.
- Disconnect old disposal (if present): unplug or disconnect hardwire, remove drain lines, twist off mounting ring.
- Inspect and prep sink flange. If the existing flange is corroded or leaking plumber’s putty, they’ll remove it, clean the sink underside, and install a fresh flange with new putty.
- Mount new disposal by aligning it with the flange and twisting the mounting ring into locked position.
- Connect drain lines using the discharge tube and attaching it to your P-trap or continuous waste line. For dishwashers, they’ll knock out the dishwasher nipple plug and attach the drain hose with a hose clamp.
- Wire the unit according to manufacturer specs, ground wire (green), neutral (white), hot (black). If hardwiring, they’ll secure connections in a junction box.
- Test for leaks by running water and disposal simultaneously for several minutes.
- Demonstrate operation and explain maintenance (running cold water, avoiding fibrous foods, etc.).
Pros will also clean up debris and leave your cabinet organized. If they discover issues, corroded pipes, improper venting, or undersized electrical circuits, they’ll explain options before proceeding.
Average Costs for Garbage Disposal Installation Services
Labor-only installation (you supply the disposal) runs $100 to $250 in most markets for a basic swap with existing electrical and standard drain configuration. Many professional plumbers recommend dedicated circuits to avoid overloading kitchen power, which can add to the cost.
Full-service installation (disposal + labor) averages $250 to $550, depending on disposal quality:
- Budget models (1/3 HP, basic grind): $80–$150 unit cost
- Mid-range (1/2 to 3/4 HP, stainless steel grind components): $150–$300
- Premium models (1 HP, multi-grind stages, sound insulation): $300–$600+
Add-on costs that frequently surprise homeowners:
- New electrical circuit or switch installation: $150–$400 (requires electrician)
- Drain pipe modification (moving from center drain to offset, adding tailpiece extensions): $75–$200
- Flange replacement if sink opening is damaged: $50–$100
- Disposal of old unit if not included: $20–$40
- Permit fees (if electrical work requires one): $50–$150, depending on municipality
Many regions show cost variations: metropolitan areas on the coasts run 20–40% higher than Midwest or Southern markets. Home service platforms like HomeAdvisor aggregate local pricing to help benchmark quotes.
Expect total project costs from $200 (simple swap, DIY-purchased unit) to $900+ (new circuit, premium disposal, complex plumbing modifications).
How to Choose the Right Installation Service Provider
Start with licensed plumbers, not handymen, especially if any electrical work is involved. Plumbing licenses require apprenticeship hours and code knowledge: handyman licensing (where it exists) typically doesn’t cover gas or extensive electrical.
Vetting checklist:
- License and insurance. Verify state plumbing license number online and confirm they carry general liability and workers’ comp. If they’re doing electrical, they should have a licensed electrician on staff or hold a separate electrical license.
- Disposal brand familiarity. Ask which brands they install most often. Techs who regularly work with InSinkErator, Moen, or Waste King will finish faster and troubleshoot better than someone learning your model on the fly.
- Written estimates. Get itemized quotes listing disposal model (or “customer-supplied”), labor, materials, and potential add-ons. Verbal estimates are worthless if disputes arise.
- Warranty terms. Labor warranty should cover leaks and operational issues for at least 30 days. Manufacturer warranties on the disposal itself range from 1 year (budget models) to limited lifetime (premium), but only apply if installation meets their standards.
- Reviews with plumbing-specific detail. Generic five-star ratings mean little. Look for mentions of leak-free work, code compliance, cleanup, and how they handled surprises (old pipes, wrong disposal size, etc.).
Platforms like Houzz feature verified contractor reviews with project photos, which helps when comparing local installers. Avoid any provider who pressures same-day decisions or quotes wildly below market, disposal installation has slim margins, and lowball bids often signal unlicensed work or hidden fees.
Red flags: No callback within 48 hours, refusal to provide license number, cash-only payment, or inability to explain code requirements for your municipality.
Common Installation Issues and How Pros Handle Them
Leaking sink flange: Often caused by insufficient or dried-out plumber’s putty. Pros remove the disposal, clean old putty completely from the sink underside, apply a fresh 1/4-inch bead of putty around the flange, and torque the mounting bolts evenly to avoid tilting.
Disposal doesn’t turn on: Usually a tripped reset button (red button on disposal bottom) or GFCI outlet. If neither fixes it, the issue is often a loose wire connection or a failed switch. Pros carry voltage testers to diagnose in minutes.
Drain backs up into the opposite sink bowl: Common in double-bowl installations when the continuous waste tee is installed backward or the drain isn’t vented properly. Requires reconfiguring the drain assembly or, in older homes, adding an auto-vent (check local code, not all jurisdictions allow them).
Disposal hums but won’t spin: Something’s jammed in the flywheel. Professionals insert an Allen wrench (usually 1/4-inch) into the hex socket on the disposal bottom and manually rotate to clear the jam, then hit the reset button. If the motor’s actually burned out, they’ll recommend replacement.
Dishwasher drains into disposal and creates backflow: The dishwasher drain hose must connect to the disposal inlet above the P-trap and form a high loop or air gap to prevent backflow. Pros secure the hose with a clamp and route it high under the countertop before dropping to the disposal.
Inadequate electrical circuit: If your disposal shares a circuit with multiple kitchen outlets and trips the breaker, it needs a dedicated circuit. This is code in most jurisdictions for disposals over 1/3 HP. A pro will assess your panel capacity and run new wire if needed, not a quick fix, but it solves the problem permanently.
Experienced installers carry shims, flexible drain couplings, tailpiece extensions, and an assortment of slip-joint washers to adapt to non-standard sink heights and drain alignments. That parts kit is often the difference between a completed job and a return trip.
Conclusion
Garbage disposal installation straddles plumbing and electrical work, which is exactly why so many homeowners hand it off to pros. If your setup is straightforward and you’ve got the tools and confidence, DIY can save $150 to $300. But if you’re dealing with old plumbing, need a new circuit, or just want warranty-backed peace of mind, hiring a licensed plumber is money well spent. Get multiple quotes, verify credentials, and don’t skimp on quality, nobody wants to troubleshoot a leak at 10 PM on a weeknight.